Sunday, April 21, 2013

Nokia 3110c no lights on lcd and keypad solution

Google

Step by Step Solution

1. see if all backlights on keypad is
complete
(remember that missing backlights
on 3110c unit can cause no lcd
light too)
2. if all backlight is in tact....use
tester to check the lines..
3. if you see this line is broken...
just apply jumper as shown on the
image below

Nokia 110 Local Mode Test Mode Problem Repair Solution

Google
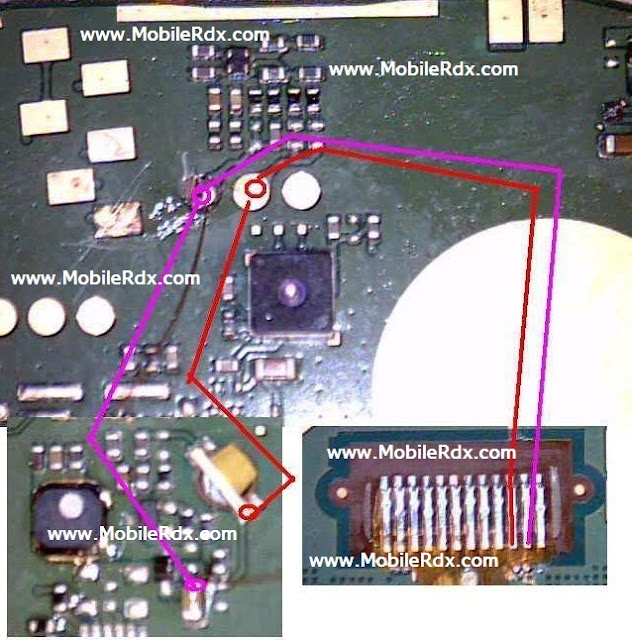
Nokia 110 Test Mode Local Mode
Problem Solution can be found in
this diagram simply remove these
two resistance bake of the battery
terminal and if there is any rust
and set is water damage clean the
whole set with electronics cleaner
and leave it to dry for a few mints.
In Nokia 110 Local Mode or Nokia
110 Test Mode problems occur
because of the Software Problems,
in some cases it may be caused by
hardware problems too. Whenever
you get this problem First thing
you should do is Flash your phone
with same or Latest Firmware of
the Cell Phone available at the
time. Then write a good Permanent
Memory(PM) file of your phone.
Then Do a complete Unlock and
check if the Problem is solved.
Before Doing any hardware
solution you should clean the
Motherboard of the Mobile Phone.
Please Note that we will edit these
solutions or add new ones if found
in this page at any time in the
future. So feel free to come back
any time on this page to stay up to
date.
Here Are Mode Problem Test Mode
Solution. Please Observe Carefully.
If you have further Questions
please don’t hesitate to leave a
comment.

Nokia1616,1280,1800 Test Mode Local Mode Problem Solution

Google

Nokia 1800,1616,1280 Local
Mode Problem Repairing
Solutions are available in the
following article. Also you will
find Nokia 1800,1616,1280 Test
Mode Solution and other
repairing information in the
diagrams further in this post.
In Nokia 1800,1616,1280 Local
Mode or Nokia 1800,1616,1280
Test Mode problems occur
because of the Software
Problems, in some cases it may
be caused by hardware problems
too. Whenever you get this
problem First thing you should
do is Flash your phone with
same or Latest Firmware of the
Cell Phone available at the time.
Then write a good Permanent
Memory(PM) file of your phone.
Then Do a complete Unlock and
check if the Problem is solved.
Before Doing any hardware
solution you should clean the
Motherboard of the Mobile
Phone.
Please Note that we will edit
these solutions or add new ones
if found in this page at any time
in the future. So feel free to
come back any time on this page
to stay up to date.
If you have further Questions
please don’t hesitate to leave a
comment.

Saturday, April 20, 2013

Nokia X1, X1-01 Handsfree Ways Jumper Solution

Google

Nokia X1, X1-01 Handsfree
Activated No Sound On Headphone
Problem Repairing Solutions are
available in the following article.
Also you will find Nokia X1,
X1-01Headset Solution and
Jumpers information in the
diagrams further in this article. If
your cell phone is having one of
these faults check these diagrams
out and do the solutions step by
step.
In Nokia X1, X1-0 Handsfree
Problem can occur because of the
faulty Handsfree Connector or bad
it’s connection to the Cell Phone’s
PCBA Motherboard. Bad
connections can happen for many
reasons like if it’s dropped or got
wet, bad connection may also
happen because of Carbon, Rust or
even Dirt. So first of all you should
clean Nokia X1, X1-01 Handsfree
Connector Ways and PCBA
Motherboard of the Mobile Phone.
You Can Use any cleaning liquid for
this purpose like CTC or any other
you prefer. If you are certain that
the bad connection is not the
reason for your Mobile Phone’s
fault, then you can replace the
Handsfree Connector with a new
one.
If the problem still remains then
you should continue with the
following repairing solutions.
Here is a list of all the solutions
for the mentioned problems or
faults available at the moment.
Please Note that we will edit these
solutions or add new ones if found
in this page at any time in the
future. So feel free to come back
any time on this page to stay up to
date.
Nokia X1, X1-01 Handsfree
Activated
Nokia X1, X1-01 Handsfree Ways
Jumper
Nokia X1, X1-01 Headphone
Solution
Nokia X1, X1-01 No Sound On
Handsfree
Here Are The Repairing Solutions.
Please Observe Carefully.
If you have further Questions
please don’t hesitate to leave a
comment.

Monday, April 15, 2013

Nokia 110 111 Mmc Memory Card Problem Ways Jumper Solution

Google
Nokia 110 111 Memory Card
Problem Repairing Solutions are
available in the following article.

Also you will find Nokia 110 111
Mmc Ways and Jumpers
information in the diagrams further
in this post.
This solution works on
all Nokia 110 RM-827, Nokia 1100
RM-810, Nokia 111 RM-811 and
Nokia 1110 RM-871.

In Nokia 110 111 Memory Card
Problem can occur because of the
broken MMC Jacket. You can
replace the MMC Jacket but if in
any case the prints are broken you
can Jumper the Memory Card
Jacket to the points as shown in
further diagram.
Please Note that we will edit these
solutions or add new ones if found
in this page at any time in the
future. So feel free to come back
any time on this page to stay up to
date.
If you have further Questions
please don’t hesitate to leave a
comment.


Nokia 110 111 Insert Sim Card Solution

Google

Nokia 110 111 Insert Sim Card
Problem Repairing Solutions are
available in the following
article. Also you will find Nokia 110
111 Insert Sim Ways and Jumpers
information in the diagrams further
in this post.This solution works on
all Nokia 110 RM-827, Nokia 1100
RM-810, Nokia 111 RM-811 and
Nokia 1110 RM-871.
In Nokia 110 111 Insert Sim
Problem can occur because of the
faulty Sim Card Connector, Sim IC
or it’s bad connection to the Cell
Phone’s Motherboard. Bad
connections can happen for many
reasons like if it’s dropped or got
wet, bad connection may also
happen because of Carbon, Rust or
even Dirt. So first of all you should
clean Nokia 110 111 Sim Card
Ways Track , Sim IC, Sim Card
Connector and Motherboard of the
Mobile Phone.
You Can Use any cleaning liquid for
this purpose like CTC or any other
you prefer. If you are certain that
the bad connection is not the
reason for your Mobile Phone’s
fault, then you can replace the Sim
Card Connector, Sim IC with a new
one.
Please Note that we will edit these
solutions or add new ones if found
in this page at any time in the
future. So feel free to come back
any time on this page to stay up to
date.
If you have further Questions
please don’t hesitate to leave a
comment.q

Monday, April 8, 2013

Nokia x1-01 charging no response Solution

Google

Nokia x1-01 no response charging
Solution

just remove part show in pic.

Nokia X2-01 left,E,D,C,P keys not working Done via jumper 100% Tested

Google

Nokia X2-01 left,E,D,C,P keys not
working Done via jumper 100%
Tested

Nokia 5130c And 2700 Mmc Ways Jumper Solution

Google

This solution covers for hardware
level of repair for Nokia 5130c And
2700 Mmc problem and Also you
will find Nokia 5130c And 2700
Mmc Track Ways And Jumper
information in the diagrams further
in this article.
Nokia 5130c And 2700 Mmc Ic
Jumper
Nokia 5130c Mmc Solution
Nokia 2700 Mmc Solution
Just see the solution preview below
for it shows which track to be
check and make jumper.
Please Note that we will edit these
solutions or add new ones if found
in this page at any time in the
future. So feel free to come back
any time on this page to stay up to
date.

Note: Please note that even though
every solution posted on out
website is tested by one or more
members of our team before
posting, but still we do not take
any responsibility for any damage
it may cause to your cell phones.
Use these repairing solutions at
your own risk. Thank You :)

Nokia 112 And 110 New Usb Pinout

Google

Nokia 112 And 110 New Usb Pinout
Nokia 112 And 110 New Usb Flash
Pinout
Nokia 110 Pinout
Nokia 112 pinout

Nokia Asha 202 Mic Solution

Google

If you are facing Nokia Asha 202
Mic Not Working Problem then this
diagram will help you to solve Mmc
problem in Nokia C3.
Nokia Asha 202 Mic Solution
Nokia Asha 202 Mic Jumper
Nokia Asha 202 Mic Ways
Nokia Asha 202 Mic Not Working
Nokia Asha 202 Mic Problem
Just see the solution preview below
for it shows which track to be
check and make jumper.
Please Note that we will edit these
solutions or add new ones if found
in this page at any time in the
future.
Note: Please note that even though
every solution posted on out
website is tested by one or more
members of our team before
posting, but still we do not take
any responsibility for any damage
it may cause to your cell phones.
Use these repairing solutions at
your own risk. Thank You..

Nokia Asha 311 Touch Screen Ways Jumper Solution

Google

Nokia Asha 311 Touch Solution
Nokia Asha 311 Touch Not Working
Nokia Asha 311 Touch Jumper
Nokia Asha 311 Touch Ways
This article is for Nokia Asha 311
Touch Screen Not Working problem
solution. If your phone is having
any kind of touch screen problem
diagram below can be helpful.
If your Nokia Asha 311 Touch
Screen stops working properly
instantly clean the Touch
Connector to make sure that
moisture or carbon is not causing
this trouble. If by any chance touch
connector prints are busted, I have
marked Nokia Asha 311 Touch
Connector Ways Jumper points in
the following diagram.
Please Note that we will edit these
solutions or add new ones if found
in this page at any time in the
future. So feel free to come back
any time on this page to stay up to
date.

Note: Please note that even though
every solution posted on out
website is tested by one or more
members of our team before
posting, but still we do not take
any responsibility for any damage
it may cause to your cell phones.
Use these repairing solutions at
your own risk. Thank You :)

Nokia Asha 311 Mic Jumper Solution

Google

This article is for Nokia Asha 311
Microphone Problem Solution. If
your phone’s microphone is not
working use the diagrams below to
solve this problem.
In case of microphone failure first
thing you should do is replace it a
new one. If you are certain that the
microphone is not busted or any of
the microphone connection points
are broken, I have marked Nokia
Asha 311 Mic Ways jumper points
in the following diagram.
Please Note that we will edit these
solutions or add new ones if found
in this page at any time in the
future. So feel free to come back
any time on this page to stay up to
date.
Nokia Asha 311 Mic Solution
Nokia Asha 311 Mic Jumper Track
Ways
Nokia Asha 311 Mic Solution
N ote: Please note that even though
every solution posted on out
website is tested by one or more
members of our team before
posting, but still we do not take
any responsibility for any damage
it may cause to your cell phones.
Use these repairing solutions at
your own risk. Thank You :)

Nokia 101 sim ways tested solution

Google

Nokia 101 sim ways tested solution -

Nokia X6 Mic solution

Google

Nokia X6 Mic solution

Sunday, April 7, 2013

Nokia X2 Keypad Ways Jumper Solution

Google

Nokia X2 Keypad Ways Jumper
Solution
If any, all or a few keys not
working in nokia x2 then this post
will help you to solve all keypad
not working problems easily and in
a quick way. Simply look at
diagram bellow and check all the
track and links as shown in it.

Once you check with meter if any
of them is broken make these
jumpers and your problem will
solve easily. All same color keys
outer and inner are to define same
link ways. If a single key is not
working we can apply jumper form
other key that have same color for
outer or inner.
Some key are going to resistance
and capacitors in diagram so we
have to apply jumpers on those
places and parts. In diagram above
a few small diagrams have red
border and these are zoom images
of the board so that you can see
parts vary clearly.
So zoom diagram are only to show
close up of board. The diagram
above also contain on off button
ways in it.
If you have further Questions
please leave a comment

Nokia C5-03, C5-06 Charging Ways Jumper Solution

Google

Nokia C5-03, C5-06 Charging
Problem Repairing Solutions are
available in the following article.
Also you will find Nokia C5-03,
C5-06 Charging Ways Track and
Jumpers information in the
diagrams further in this post.
In Nokia C5-03, C5-06 Charging
Problem can occur because of the
faulty Charging Connector or it’s
bad connection to the Cell Phone’s
Motherboard. Sometimes a faulty
battery can cause charging
problems. Bad connections can
happen for many reasons like if it’s
dropped or got wet, bad
connection may also happen
because of Carbon, Rust or even
Dirt. So first of all you should
clean Nokia C5-03, C5-06 harging
Connector Ways and Motherboard
of the Mobile Phone.
Please Note that we will edit these
solutions or add new ones if found
in this page at any time in the
future. So feel free to come back
any time on this page to stay up to
date.
If you have further Questions
please don’t hesitate to leave a
comment.

Nokia C5-03, C5-06 Touch Screen Jumper Solution

Google

This solution is for Nokia C5-03,
C5-06 Touch Screen Problem and
Touch Screen Connector Ways
Jumpers. This solution works for
both of these phones.
Nokia C5-03, C5-06 Touch Screen
Connector mostly malfunctions
because of moisture or carbon, so
before doing any hardware solution
you should clean it and see if the
problem is solved. I have marked
all Nokia Asha 306 Touch Screen
Connector Ways jumper points in
the following diagram. If you are
certain that connector is in good
shape then change the marked IC
to solve this problem.
Please Note that we will edit these
solutions or add new ones if found
in this page at any time in the
future. So feel free to come back
any time on this page to stay up to
date.
If you have further Questions
please don’t hesitate to leave a
comment.

Nokia C5-03, C5-06 Mic Problem Jumper Solution

Google

This article covers Nokia C5-03 and
Nokia C5-06 Mic Problem Solution.
If your phone’s microphone is not
working consult the diagram below.
This solution works on all Nokia
C5-03, C5-06.
We have marked Nokia C5-03 and
Nokia C5-06 Mic Ways and Jumper
points in this diagram but before
you make these jumpers make sure
that a faulty microphone is not
causing this problem. Test it with
an electronics meter or simply
replace it with a new one.
Please Note that we will edit these
solutions or add new ones if found
in this page at any time in the
future. So feel free to come back
any time on this page to stay up to
date.
If you have further Questions
please don’t hesitate to leave a
comment.

Nokia 5800 Power Switch JumperSolution

Google

Nokia 5800 Power Switch Problem
Repairing Solutions are available in
the following article. Also you will
find Nokia 5800 Power Button
Track Ways and Jumpers
information in the diagrams further
in this post.
If your Nokia 5800 Power Button
Ways or Power Switch also known
as On/Off Switch is damaged
somehow by whether mishandling
or any other reason you can always
replace it with a new one. But if
the Power Button prints meaning
Connection points on which the the
Power Button is soldered to
the Nokia 5800 Power Switch
Ways on motherboard are broken,
Diagrams in this article can help
you.
Please Note that we will edit these
solutions or add new ones if found
in this page at any time in the
future. So feel free to come back
any time on this page to stay up to
date.
If you have further Questions
please don’t hesitate to leave a
comment.

Nokia 5800 Insert Sim Problem Solution Ways

Google

Nokia 5800  Insert Sim Card
Problem Repairing Solutions are
available in the following article.
Also you will find Nokia
5800 Insert Sim Ways and Jumpers
information in the diagrams further
in this post.
In Nokia 5800 Insert Sim
Problem can occur because of the
faulty Sim Card Connector, Sim IC
or it’s bad connection to the Cell
Phone’s Motherboard. Bad
connections can happen for many
reasons like if it’s dropped or got
wet, bad connection may also
happen because of Carbon, Rust or
even Dirt. So first of all you should
clean Nokia 5800 Sim Card Ways ,
Sim IC, Sim Card Connector and
Motherboard of the Mobile Phone.
You Can Use any cleaning liquid for
this purpose like CTC or any other
you prefer. If you are certain that
the bad connection is not the
reason for your Mobile Phone’s
fault, then you can replace the Sim
Card Connector.
Please Note that we will edit these
solutions or add new ones if found
in this page at any time in the
future. So feel free to come back
any time on this page to stay up to
date.
If you have further Questions
please don’t hesitate to leave a
comment.
Note: Every diagram we post on
www.gauravgsm.org is tested by one or
more members of our team. Still
Use them at Your Own Risk we are
not responsible if these solutions
may cause any harm to your
phone.

Nokia X6 Fake charging solution

Google

Nokia X6 Fake charging solution

Friday, April 5, 2013

Asha 203 On/Off Button Ways Jumper Solution

Google

This solution is for Nokia Asha 203
Power Button Problem. If your
phone’s power button is damaged I
have marked it’s ways in the
diagram below.
Just make the jumpers at the first
contact point. If by any chance that
is also broken I have marked two
more contact point next to the
first. It is not recommended to
bypass the parts the first jumpers
are made to.
Please Note that we will edit these
solutions or add new ones if found
in this page at any time in the
future. So feel free to come back
any time on this page to stay up to
date.
If you have further Questions
please don’t hesitate to leave a
comment.
Note: Every diagram we post on
mobilerdx.com is tested by one or
more members of our team. Still
Use them at Your Own Risk we are
not responsible if these solutions
may cause any harm to your
phone.

Nokia 110 And 112 Lcd LightJumper Solution

Google
Nokia 112 and Nokia 110 Light
Solution Ways and Jumper points
are in this article. If your phone’s
Lcd Display lights are not working
make the jumper as shown in the
diagram below. This solution works
on all Nokia 110 , Nokia
111
and Nokia 112.


First of all before making any
hardware solutions clean the area
behind LCD connector and the
whole motherboard to make sure
that rust or carbon is not causing
this problem. I have marked Nokia
112 and Nokia 110 light ways
jumper points in the following
diagram. If jumper does not work
replace the marked component.
Also try replacing the LCD itself
because sometime damaged LCD
can cause this problem.
Please Note that we will edit these
solutions or add new ones if found
in this page at any time in the
future. So feel free to come back
any time on this page to stay up to
date.
If you have further Questions
please don’t hesitate to leave a
comment.
Note: Every diagram we post on
mobilerdx.com is tested by one or
more members of our team. Still
Use them at Your Own Risk we are
not responsible if these solutions
may cause any harm to your
phone.

Thursday, April 4, 2013

Random Posts

Blogger Widgets